|
|
|
Sculpting Tutorial
Week One: Tools, Armatures and Basic Shapes |
Tools
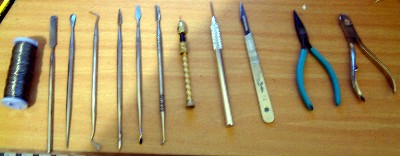
Here you can see my tools, from left to right they are:
- Florist's wire
- Half a dozen 'Wax Carver' sculpting tools
- Pin vice
- Pointy tool (I think it was intended to be a scriber of some kind)
- Scalpel
- Needlenose pliers
- Clippers
|
 |
Basic Wire Armature
To the right is a picture of the initial armature for the thing I am sculpting.
As he is human, he has to conform to a few anatomical regularities. The ones I know of are:
- The elbows are just below the bottom of the ribcage when in a stnading position
- The wrists are just below the bottom in a standing position
- The ends of the fingers are just above the knee in a stnading position
- From the wrist to the elbow is the same as the elbow to the bottom of the shoulder
- From the knee to the heel is slightly shorter in length than the knee to the bottom
- From the elbow to the wrist is the same as the length of the foot
- The length of the hand from heel to fingertip is the same as from chin to hairline
As you can see, he is just twisted together wire, stuck into a cork. His arms are as yet unclipped,
as I am not sure how long they need to be. |
|
Fleshing Out
So far you have what amounts to a skeleton for your potential hero. Now he needs
a bit of flesh to put on those bones and thats where you come in. Your armature, along with this
initial stage, really decides how your sculpt will turn out; big shouldered, barrel-chested brute,
or slight and sinuous female seductress. Shoulder and hip size tend to define overall shape, bearing
in mind that women have (relatively) broader hips than blokes. Some sculptors will skimp on the
initial layer (I know I usually do), while others will work up a full musculature before they go over
it with clothes, armour and so forth. In this instance, I have done a bit of both; the side on your
left is a skimpy version, the arms left bare and the body only very slightly filled out. The other
side has had a pretty comprehensive set of muscles built up (obviously based on my own adonis-like
stature), ready for anything that comes after. The second option is probably best if you want a
miniature with a lot of bared flesh or obvious muscle, while the first can really end up becoming
anything. |
|
Weapon Armatures
To the right you can see the basic armature of this guy's weapon; his trusty axe.
I decided to make it with coiled wire because it was to hand and also the fact that I have no existing
weapon casts to use. However, that is not important; as you can see, just with this quick skeleton I
have established a basic shape for the axe. It will later be covered in brown stuff (more rigid than
green stuff), then cut and filed to shape. It may even get some fancy decoration, wood grain or some
wrappings, depending on how complicated I want the guy to end up |
|
Next Week
Next week you can expect to see the development of clothes, shoes, chainmail and an
initial layer on that axe! | |
|
|


